
Add webhosting to a DotNet Console App
- Glenn Prince
- Development
- October 15, 2020
Table of Contents
Building a DotNet core console application can sometimes be the right move to start with, which I found with both the Discord Bot Series and the related Discord Bot Project am I spending my time on. The problem is the world works on the Internet these days and not having the ability to talk to your application via a webserver makes things extremely difficult. Thankfully it is not overly difficult to modify your application to have both a console application with an inbuilt webserver to listen on a port.
Starting Application
To start with we have a basic console application with simple Hosted Service injected into it, as described here(https://docs.microsoft.com/en-us/aspnet/core/fundamentals/host/generic-host?view=aspnetcore-3.1#ihostapplicationlifetime-1). This service is injected in by using the following Main program method:
public static async Task Main(string[] args)
{
    var host = new HostBuilder()
        .ConfigureHostConfiguration(configHost =>
        {
            configHost.Sources.Clear();
            configHost.SetBasePath(Directory.GetCurrentDirectory());
            configHost.AddJsonFile("Config/hostsettings.json", optional: true);
            configHost.AddEnvironmentVariables(prefix: "APP_");
            configHost.AddCommandLine(args);
        })
        .ConfigureAppConfiguration((hostContext, configApp) =>
        {
            configApp.AddJsonFile("Config/appsettings.json", optional: true);
            configApp.AddJsonFile($"Config/appsettings.{hostContext.HostingEnvironment.EnvironmentName}.json", optional: true);
            configApp.AddEnvironmentVariables(prefix: "APP_");
            configApp.AddCommandLine(args);
        })
        .ConfigureServices((hostContext, services) =>
        {
            services.AddSingleton<IHostedService, ConsoleService>();
        })
        .ConfigureLogging((hostContext, configLogging) =>
        {
            configLogging.AddConsole();
            configLogging.AddDebug();
        })
        .UseConsoleLifetime()
        .Build();

    await host.RunAsync();
}
This is some pretty common boilerplat code that loads a lot of configuration options and logging, with the injected service as a Singleton. In the OnStarted call of the application I have a call to the following method which just writes to the Logger every ten seconds to show the console application is running:
private async void Pinger()
{
    _logger.LogInformation("Pinger Function Started");

    for(var i = 0; i < 100; i++)
    {
        _logger.LogInformation("Ping number: " + i);
        await Task.Delay(5000);
    }

    _logger.LogInformation("Pinger Function Finished");
}
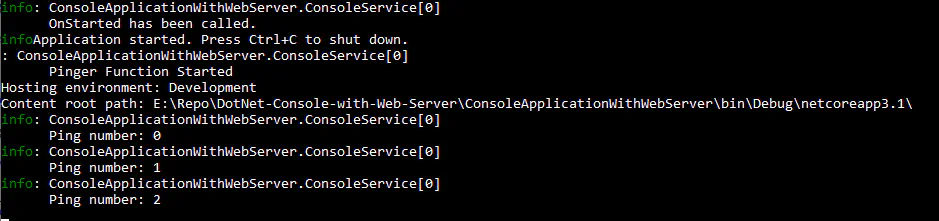
Your application could be doing a lot of things but this gives you an idea of a console based service running in the background.
Adding ASP.NET Core
Now lets look at adding ASP.NET core functionality like we would with a normal website. Firstly, in your project file we need to change the SDK we are using by modifying the top line to be ‘
<Project Sdk="Microsoft.NET.Sdk.Web">
  <PropertyGroup>
    <OutputType>Exe</OutputType>
    <TargetFramework>netcoreapp3.1</TargetFramework>
  </PropertyGroup>
  <ItemGroup>
    <PackageReference Include="Microsoft.AspNetCore" Version="2.2.0" />
    <PackageReference Include="Microsoft.Extensions.Configuration.CommandLine" Version="2.2.0" />
    <PackageReference Include="Microsoft.Extensions.Configuration.EnvironmentVariables" Version="2.2.0" />
    <PackageReference Include="Microsoft.Extensions.Configuration.Json" Version="2.2.0" />
    <PackageReference Include="Microsoft.Extensions.Hosting" Version="2.2.0" />
    <PackageReference Include="Microsoft.Extensions.Hosting.Abstractions" Version="2.2.0" />
    <PackageReference Include="Microsoft.Extensions.Logging" Version="2.2.0" />
    <PackageReference Include="Microsoft.Extensions.Logging.Configuration" Version="2.2.0" />
    <PackageReference Include="Microsoft.Extensions.Logging.Console" Version="2.2.0" />
    <PackageReference Include="Microsoft.Extensions.Logging.Debug" Version="2.2.0" />
  </ItemGroup>
  <ItemGroup>
    <Content Include="Config\**">
      <CopyToOutputDirectory>PreserveNewest</CopyToOutputDirectory>
    </Content>
  </ItemGroup>
</Project>
This will add the core packages to our project when we save our project file and reload the project. You will notice now under our frameworks and packages section we have AspNetCore modules available and added. Next we are going to modify the Main method in our program class to align it more with the standard AspNet template. Most of this config we are going to push into a static IHostBuilder method called CreateHostBuilder. Our main method should now just have one line of code: await CreateHostBuilder(args).Build().RunAsync(); with out newly created CreateHostBuilder method below:
public static IHostBuilder CreateHostBuilder(string[] args) =>
    Host.CreateDefaultBuilder(args)
        .ConfigureHostConfiguration(configHost =>
        {
            configHost.SetBasePath(Directory.GetCurrentDirectory());
            configHost.AddJsonFile("Config/hostsettings.json", optional: true);
            configHost.AddEnvironmentVariables(prefix: "BOT_");
            configHost.AddCommandLine(args);
        })
        .ConfigureAppConfiguration((hostContext, configApp) =>
        {
            configApp.AddJsonFile("Config/appsettings.json", optional: true);
            configApp.AddJsonFile(
                $"Config/appsettings.{hostContext.HostingEnvironment.EnvironmentName}.json",
                optional: true);
            configApp.AddEnvironmentVariables(prefix: "BOT_");
            configApp.AddCommandLine(args);
        })
        .ConfigureLogging((hostContext, configLogging) =>
        {
            configLogging.AddConfiguration(hostContext.Configuration.GetSection("Logging"));
            configLogging.AddConsole();
            configLogging.AddDebug();
        })
        .ConfigureWebHostDefaults(webBuilder =>
        {
            webBuilder.UseStartup<Startup>().ConfigureLogging(logging =>
            {
                logging.AddConsole();
                logging.AddDebug();
            });
        })
        .UseConsoleLifetime();
Most of this function is the same as the previous set up we made in our main function with one exception: we are now using in our builder ConfigureWebHostDefaults which configures the ASP.NET webhosting component. We are using a class called
public class Startup
{
    public Startup(IConfiguration configuration)
    {
        Configuration = configuration;
    }

    public IConfiguration Configuration { get; }

    // This method gets called by the runtime. Use this method to add services to the container.
    public void ConfigureServices(IServiceCollection services)
    {
        services.AddControllersWithViews();
        services.AddSingleton<ConsoleService>();
    }

    // This method gets called by the runtime. Use this method to configure the HTTP request pipeline.
    public void Configure(IApplicationBuilder app, IWebHostEnvironment env)
    {
        if (env.IsDevelopment())
        {
            app.UseDeveloperExceptionPage();
        }
        //app.UseHttpsRedirection();
        app.UseRouting();
        app.UseAuthorization();
        app.UseEndpoints(endpoints =>
        {
            endpoints.MapControllerRoute(
                name: "default",
                pattern: "{controller=Home}/{action=Index}/{id?}");
        });
        app.ApplicationServices.GetService<ConsoleService>().StartAsync(new System.Threading.CancellationToken()).Wait();
    }
}
This is the boilerplate code for running our default web host that enables web controllers, as well as routing, authorization and HTTPS, as well as injecting our ConsoleService as a Singleton into the services collection. Because we want our current console service to start running as soon as we launch we also start it up at configuration time by looking it up in our ApplicationServices collection. When we added ASP.NET Core to our application a launchSettings.json file was also created that contains local settings for our web server. I modified mine a little to look like this:
{
  "iisSettings": {
    "windowsAuthentication": false,
    "anonymousAuthentication": true,
    "iisExpress": {
      "applicationUrl": "http://localhost:62636/",
      "sslPort": 44384
    }
  },
  "profiles": {
    "ConsoleAppDev": {
      "commandName": "Project",
      "environmentVariables": {
        "ASPNETCORE_ENVIRONMENT": "Development"
      },
      "applicationUrl": "https://localhost:5043;http://localhost:5080"
    }
  }
}
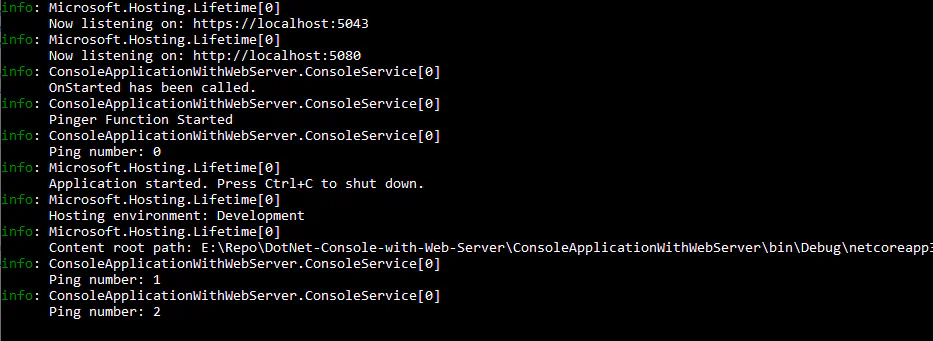
Now when we start our project we should have a running webserver listed in our console application. Mine is running on ports 5043 and 5080 but you can specify different ports in our configuration file. But you will notice that if we try and browse our server that we get errors. This is because there is no controllers set up serving web pages and no content to display. Let’s look at that next.
Adding Controllers and Content
First, lets create a default web content directory called ‘wwwroot’ in our base project. Because this is a standard folder name for web content, Visual Studio wires up the folder to be deployed with the application. If you want a different folder name, ensure you add the following item group to your project file:
<ItemGroup>
    <Folder Include="wwwroot\" />
</ItemGroup>
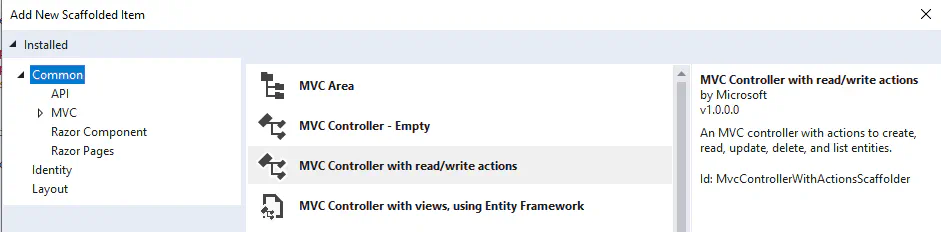
Next, create a Controllers folder in your project that you can use to hold all of web controllers. Right click on this folder, Add a new Scaffold item and select the MVC controller option that will be our default home controller. I used a simple MVC controller with all the actions but it will depend on what you need here. This controller has our basic CRUD functions but we still need a view to be rendered. Create a new folder called views and add another new razor view scaffold item to it called Home. I left it at the defaults which just shows a Home Header title.
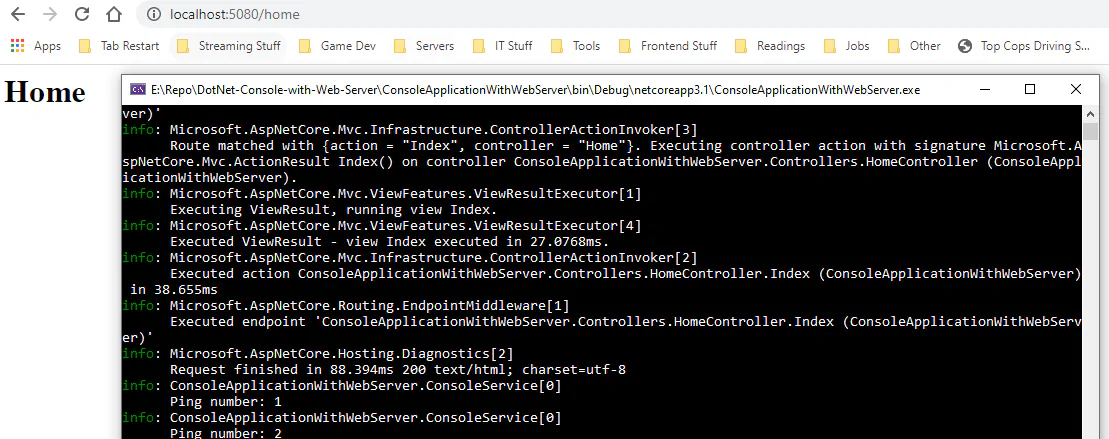
Now when we run our application we have our local web server running and our background console processes.
Summary
Converting your existing console application can be relatively easy and there are a number of reasons you would want to run both. In my case I wanted my console application to be able to implement Web Hooks to receive Event Grid messages, but I will be talking about Web Hooks for Event Grid and my use case in further posts later. The source for this example can be found in this GitHub project.