
Setting up an EventGrid Handler
- Glenn Prince
- Azure
- October 22, 2020
Table of Contents
Azure EventGrid is a messaging pipeline that allows you to easily build event based applications that allow you to wire your application components to both publish and subscribe to events. EventGrid also has a number of built in Azure connectors out of the box, including Azure numerous Azure service publishers, as well as Functions, Service Bus, Logic Apps and general web hooks.
Setting Up
If you have a more traditional ASP.NET Core application that you want to both publish and subscribe to EventGrid events, examples can be a little bit thin on the ground. I have been wanting to change the messaging architecture of the Discord Bot I have been working on to adopt EventGrid events instead, so I thought I would write up how to add an EventGrid handler example in ASP.NET Core.
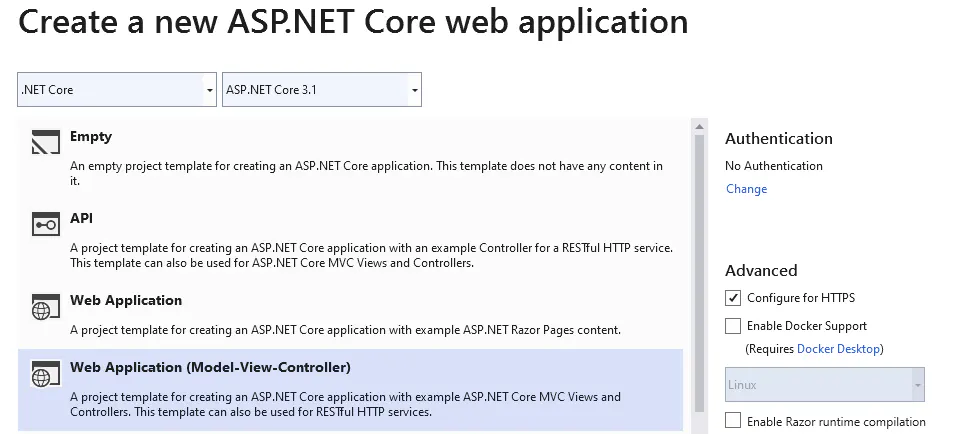
For this example I am using the standard Web Application MVC template with nothing else in it. We will use the

We will also need to configure an Event Grid topic that we can post messages on and subscribe to messages. Because we are only doing one message, I have just created a singular message in my resources group. If you have a lot more topics you are potentially configuring I highly recomend checking out Event Domains.
Configuring Event Grid
Now that we have our building blocks set up, lets configure some basic settings to support Event Grid. Firstly in our project dependencies section we need to add in the Event Grid library using the following item:
<PackageReference Include="Microsoft.Azure.EventGrid" Version="3.2.0" />
This installs the EventGrid package that we will be using to send events and decode received events. We will also need to store the EventGrid endpoint and access key. There are a number of options for storing secrets in your ASP.NET application, including environment variables and Azure Key vault, but because we are only working locally lets just keep it simple and put some values in our appsettings.json file:
"EventGrid": {
    "EventGridEndPoint": "https://<Event_Grid_Name>.eastus-1.eventgrid.azure.net/api/events",
    "EventGridAccessKey": "Your_Event_Grid_AccessKey"
}
This is all the configuration we will need right now, so lets set up our publisher service.
Event Grid Publisher
We are going to set up our Event Grid publisher as a singleton service in a similar way we would a CosmosDB service. Lets firstly define an interface for our service. Create a folder called Services and then create an IEventGridService interface class the same as the one below:
public interface IEventGridService
{
    Task PublishTopic(EventGridEvent eventPayload);
    Task PublishTopic(string topic, string subject, string eventType, object eventData);
    Task PublishTopic(string topic, string subject, string eventType, object eventData, string id, string metadataVersion, string dataVersion);
}
This interface gives us three different ways to send an Event to Event Grid. If we are going to form the event payload in our controller at collection time we can simply use the first value. If you only want to send your payload data and specify different details as strings you can use one of the other options. With our interface written, we can now implement our class. For the class constructor we are going to inject our two variable and create our Event Grid client as follows:
private EventGridClient _eventClient;
private string _eventGridEndPoint;
private string _eventHost;

public EventGridService(string eventGridKey, string eventGridEndPoint)
{
    _eventGridEndPoint = eventGridEndPoint;
    _eventHost = new Uri(_eventGridEndPoint).Host;

    TopicCredentials eventGridCredentials = new TopicCredentials(eventGridKey);
    _eventClient = new EventGridClient(eventGridCredentials);
}
Once the service is running, we can then call the PublishTopic method to send an Event to EventGrid. Because EventGrid has support for batching events we need to put our event in a List, however if you do want to support batching of multiple events you can modify as required. Here is the example method that we are going to use, other methods are built out in the source:
public async Task PublishTopic(string subject, string eventType, object eventData)
{
    var id = Guid.NewGuid().ToString();

    List<EventGridEvent> payload = new List<EventGridEvent>
    {
        new EventGridEvent(id, subject, eventData, eventType, DateTime.Now, "1.0")
    };

    await _eventClient.PublishEventsAsync(_eventHost, payload);
}
Now we can load this service as a singleton in our ConfigureServices method by adding the following:
services.AddSingleton<IEventGridService>(new EventGridService(
    Configuration.GetSection("EventGridAccessKey").Value, Configuration.GetSection("EventGridEndPoint").Value));
Now when we use a controller we can inject and use our service to publish a topic to Event Grid. For this example I am just going to add the method to our Home controller that will send an event every time the page is loaded by modifying the default controller to look like this:
private readonly ILogger<HomeController> _logger;
private readonly IEventGridService _eventGrid;

public HomeController(ILogger<HomeController> logger, IEventGridService eventGrid)
{
    _logger = logger;
    _eventGrid = eventGrid;
}

public async Task<IActionResult> IndexAsync()
{
    await _eventGrid.PublishTopic("test", "sample.eventgridhandler.testappmessage", "this is a test event");

    return View();
}
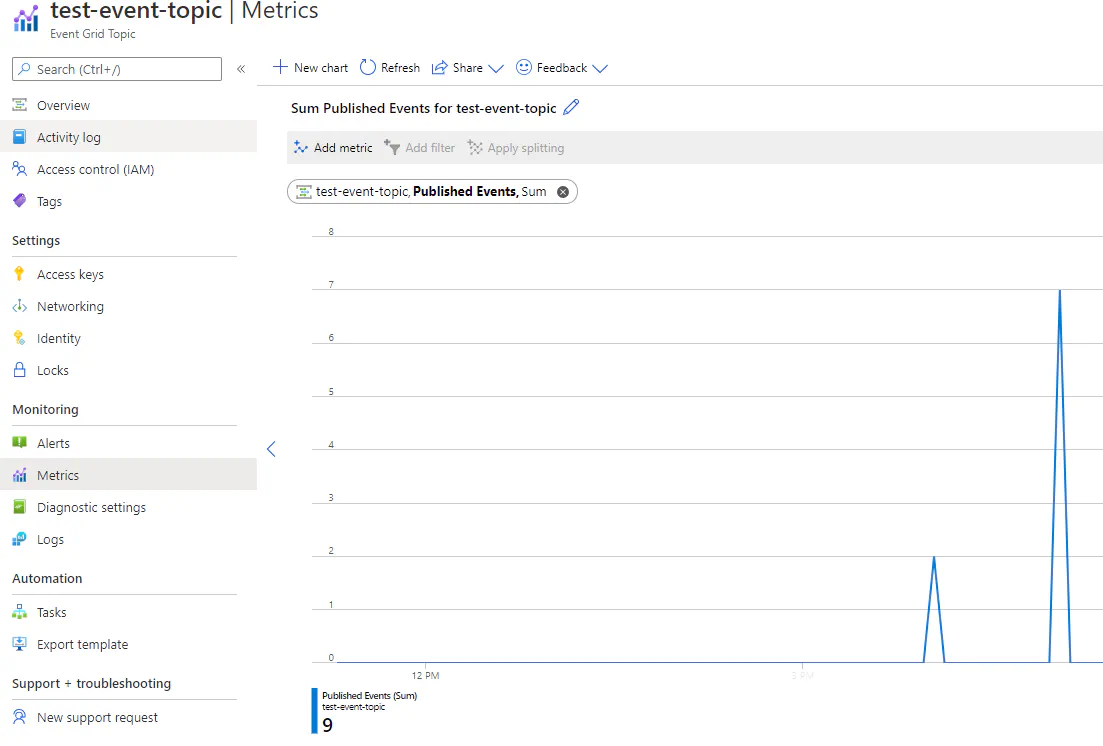
This will then send our event to Event Grid every time the page is refreshed. If we open our test event in the Azure portal, go to metrics and filter by Published Events, you should see any some events being published.
Creating an Event Grid Receiver
Now that we have a event sender, lets use a webhook to subscribe to our topic and listen for messages. For our example we are just going to listen to the same topic when are sending from and log a response. In your own application, every subscriber you create will need to respond based on the message. Because we already have a Event Grid service, lets modify it a little bit to handle some of the receiving responsibilities by adding a new method to our service:
SubscriptionValidationResponse ValidateWebhook(EventGridEvent payload);
All this method will do is validate the webhook handshake to establish the connection. Because receiving a payload is pretty specific to the endpoint we are not going to wire up any other methods. Let’s implement this method in our class as follows:
public SubscriptionValidationResponse ValidateWebhook(EventGridEvent payload)
{
    var response = JsonConvert.DeserializeObject<SubscriptionValidationEventData>(payload.Data.ToString());
    return new SubscriptionValidationResponse(response.ValidationCode);
}
As you can see, all the method does it validate the webook but because every webhook has to send a valid response, this method will be repeated for each listener.

Next, we are going to create an API controller with a single method that will listen to for events. Right click on your Controllers folder and add a new scaffold item. I am using a blank API called EventsController. In this controller we are going to inject our logger and Event Grid service like we did with the Home controller. We are also going to create a method that will listen for events called Listener:
[HttpPost]
public IActionResult Listener([FromBody] EventGridEvent[] events)
{
    foreach (var eventGridEvent in events)
    {
        _logger.Log(LogLevel.Information, "Event Grid Event Received. Type: " + eventGridEvent.EventType.ToString());

        // 1. If there is no EventType through a bad request
        if (eventGridEvent.EventType == null) return BadRequest();

        // 2. If the EventType is the Event Grid handshake event, respond with a SubscriptionValidationResponse.
        else if (eventGridEvent.EventType == EventTypes.EventGridSubscriptionValidationEvent)
            return Ok(_eventGrid.ValidateWebhook(eventGridEvent));

        // 3. If the EventType is a return message, send a message to Discord
        else if (eventGridEvent.EventType == "sample.eventgridhandler.testappmessage")
        {
            _logger.Log(LogLevel.Information, "Message Received: " + eventGridEvent.Data.ToString());
            return Ok();
        }
        else
        {
            _logger.Log(LogLevel.Error, "Unhandled Message Type: " + eventGridEvent.EventType);
            return BadRequest();
        }
    }
    return BadRequest();
}
This method does a number of things. Firstly the attribute up the top sets up the method to listen to POST messages. Next, our IActionResult takes an array of Event Grid Events out of the body of the post. To make things more efficient Event Grid will sometimes batch send events if there are a lot pending. This method will then loop through all the events and check the event payload using the following sequence:
- If the event type is null, return an error.
- If the event type is a handshake event use our method to return a subscription response
- If the event type is “sample.eventgridhandler.testappmessage” (The message we are sending) then perform our action
- If the event type is something we are not expecting, generate an error and return
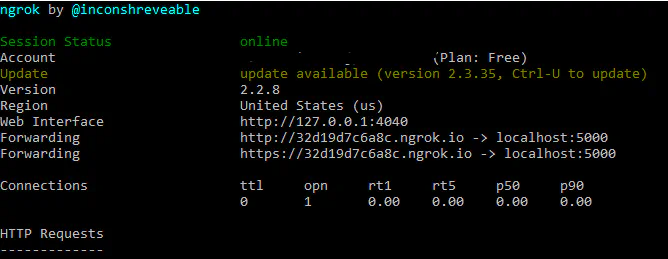
If we run our project now our API should be running and ready to subscribe on /api/Events. However, because we are running locally we can’t test because our website is not resolvable. To get around this I am using a utility called ngrok that will allow me to proxy my website to the Internet. Note down the server address as we will need that to connect our event listener.
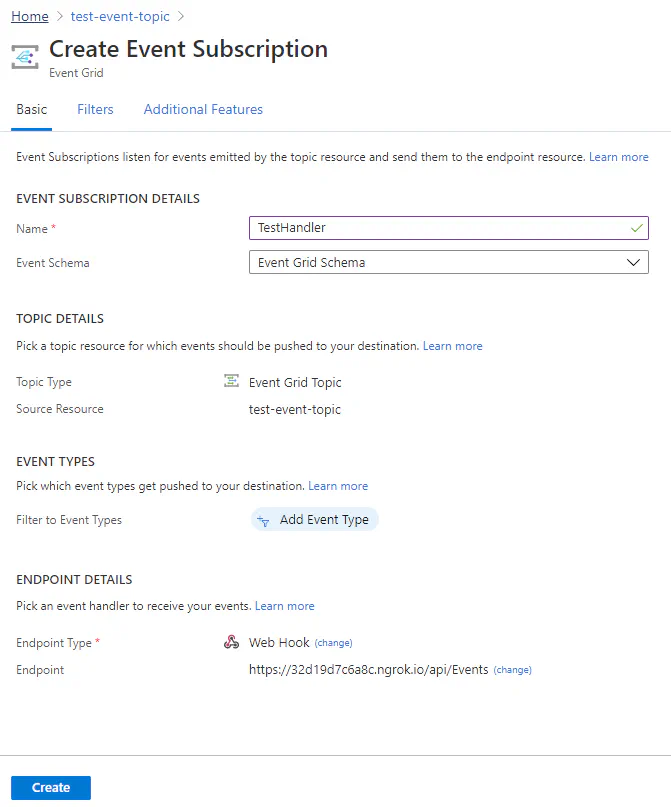
Head over to the Azure Portal and open our Event Grid topic. Because we have not subscribers set up nothing will be displayed expect the option to add a new event subscription. Select this and fill out the name and select the endpoint type as Web Hook. In here we can now enter in the address we setup using ngrok with the /api/Events path on the end. Hit create and the endpoint will be established with our web server.
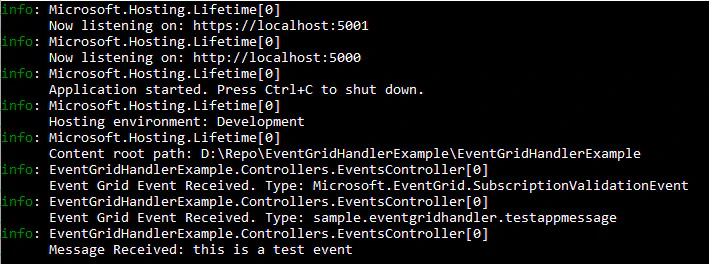
It can take a few minutes for events to start flowing to our web server, but if we look at the logging screen we should see the handshake event in the log. If we refresh our home page you should also see the return events being received by our web hook. Finally, if you check out the auditing feature in the Azure Portal, you should see a number of events being processed.
Summary
As you can see adding Event Grid support to your ASP.Net application is fairly straight forward once all the components come together. I have also published the source for this example in this GitHub project.