Discord Bot Part 4 - Using Event Grid

So far with our Discord bot we have our main parts together and running pretty simply. Any messages that come through will save to a table storage account where we can do some extra processing or keeping a log of what is going on. This runs pretty well but lets clean up our architecture and pipelines and make something a little be more scalable and interesting. First, let’s revisit what our architecture looks like:
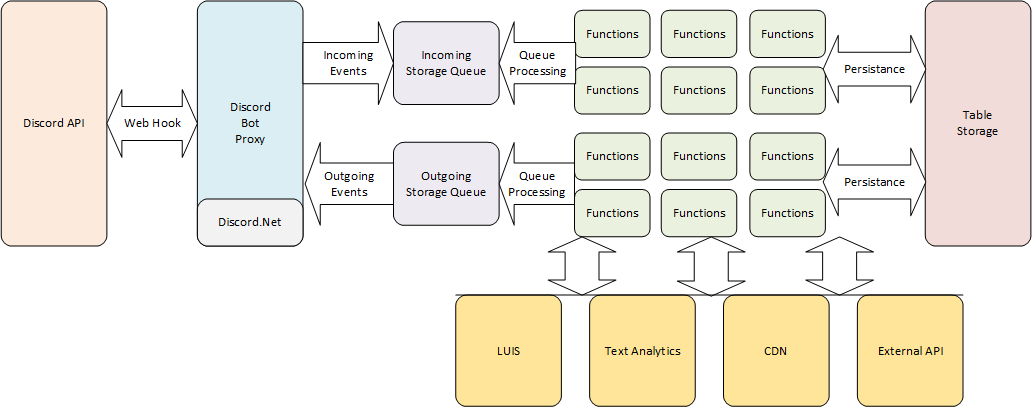
This architecture is not too bad but there is a better set of technologies we can use to move messages around called Event Grid. Why would we want to change now? Well Storage queues are great for keeping large amounts of messages around until you can batch process them, not really something we need to do with a Discord bot. We really want responses as quick as possible and it doesn’t make sense to respond to a message from 3 hours ago. Service Bus is great when you need guaranteed delivery, first in - first out or dead lettering but we really don’t need all this as Discord messages can potentially be coming from everywhere. So with a bit of rework through this post we will have the following architecture:
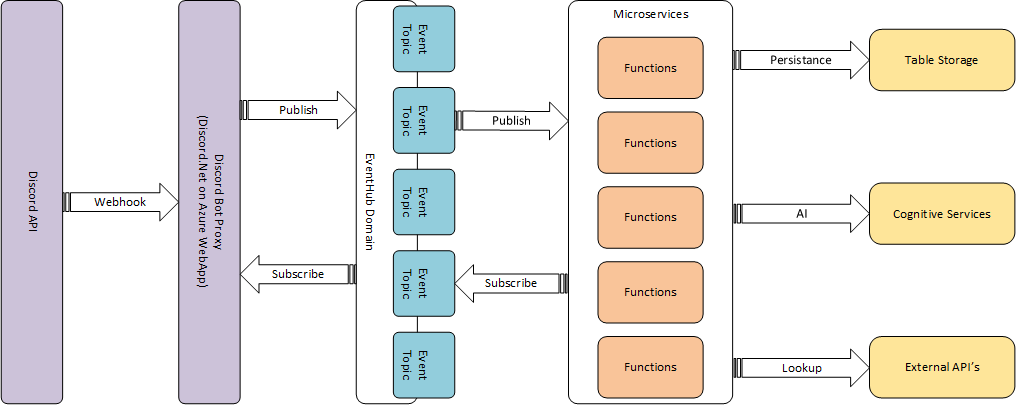
This simplifies our application quite a bit and, as you will see in a little while, makes our eventing pipeline a bit easier to monitor and manage. It also allows us to segregate our events by topic and have individual functions deal with particular topics.
Creating an Event Grid Domain
Before we dive into cleaning up our code, lets create a Event Grid Domain or Name space. This will allow us to keep all our Event Grid topics together in a single resource within the resource group.
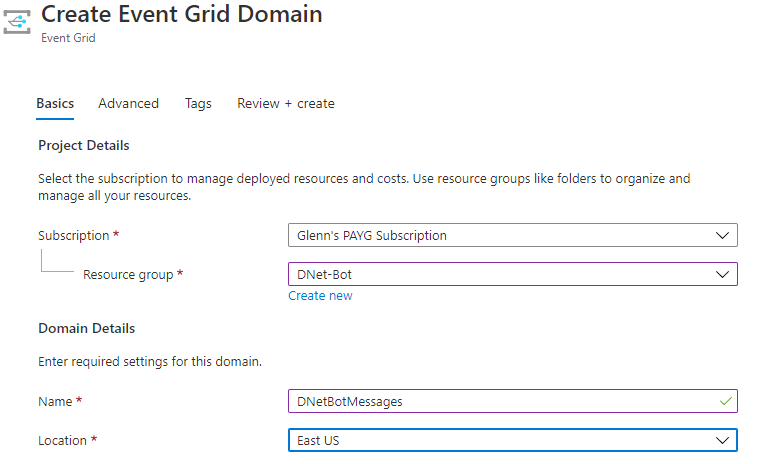
For the D-Net bot I have created a Event Grid called DNetBotMessages that will serve as the container for our D-Net Bot messaging pipeline. Other than the naming, everything else I have left as the default and we will modify if we need later.
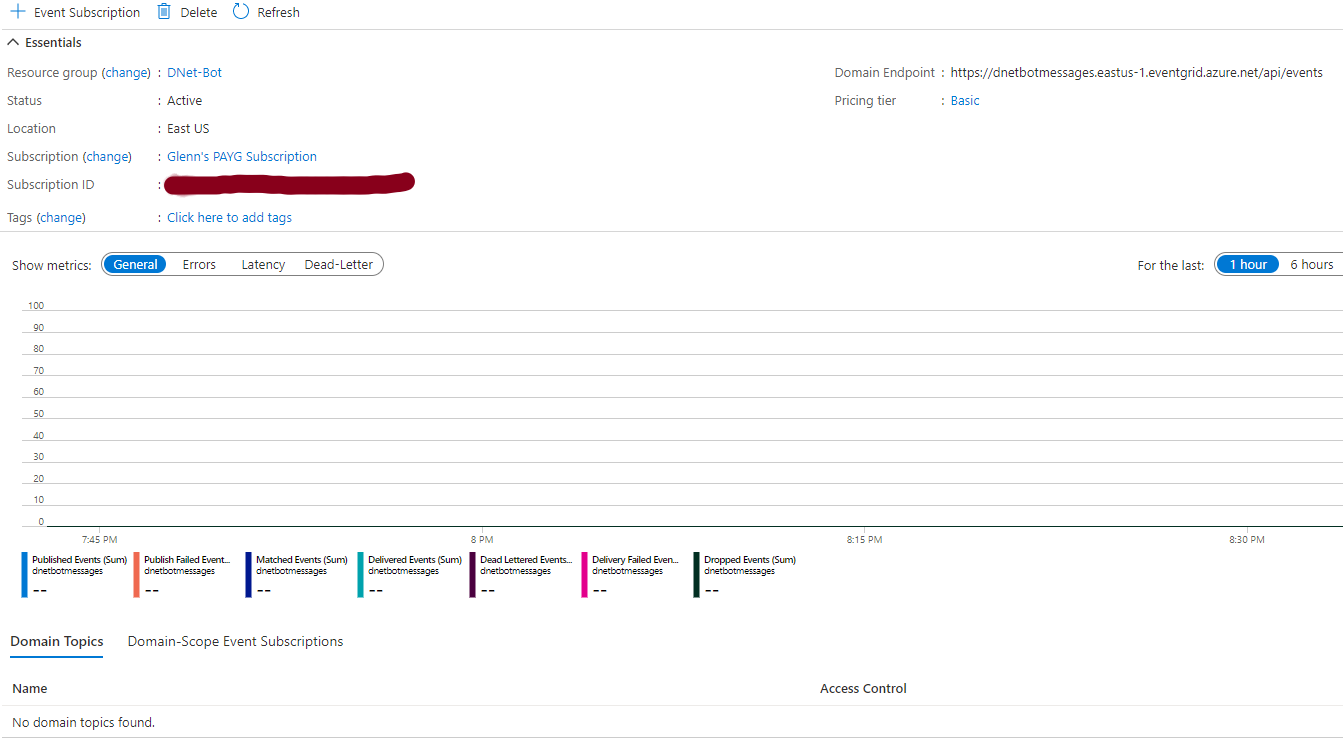
When you go into the Event Grid the default overview will give us a good understanding of what is happening with our messaging pipeline when messages are flowing through it. Obviously there is nothing right now but we will revisit this later. While we are here though, make sure you take a copy of an access key in the access keys section.
Reconfiguring for Event Grid
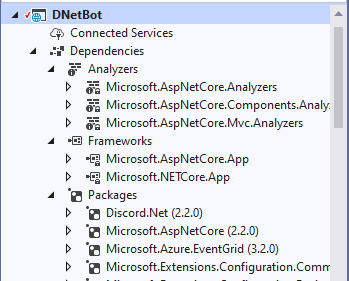
First in our project dependencies section, let’s trim out the other dependencies and add in the Event Grid. Your project dependencies section should then look like the following:
<ItemGroup>
    <PackageReference Include="Discord.Net" Version="2.1.1" />
    <PackageReference Include="Microsoft.Azure.EventGrid" Version="3.2.0" />
    <PackageReference Include="Microsoft.Extensions.Configuration.CommandLine" Version="2.2.0" />
    <PackageReference Include="Microsoft.Extensions.Configuration.EnvironmentVariables" Version="2.2.0" />
    <PackageReference Include="Microsoft.Extensions.Configuration.Json" Version="2.2.0" />
    <PackageReference Include="Microsoft.Extensions.Hosting" Version="2.2.0" />
    <PackageReference Include="Microsoft.Extensions.Hosting.Abstractions" Version="2.2.0" />
    <PackageReference Include="Microsoft.Extensions.Logging" Version="2.2.0" />
    <PackageReference Include="Microsoft.Extensions.Logging.Configuration" Version="2.2.0" />
    <PackageReference Include="Microsoft.Extensions.Logging.Console" Version="2.2.0" />
    <PackageReference Include="Microsoft.Extensions.Logging.Debug" Version="2.2.0" />
</ItemGroup>
We also need to change our Project SDK line to: <Project Sdk="Microsoft.NET.Sdk.Web">. Then, in our local hostsettings.json file we will clean out all the settings except the following:
{
  "environment": "Development",
  "LOG_LEVEL": "INFO",

  "DISCORD_BOT_TOKEN": "Your_Discord_Bot_Token",

  "EventGridDomainEndPoint": "https://<Event_Grid_Name>.eastus-1.eventgrid.azure.net/api/events",
  "EventGridDomainAccessKey": "Your_Event_Grid_Domain_AccessKey"
}
This removes all the other settings for the storage queue and other aspects and just contained the Discord Bot Token and Event Key. Moving onto the DiscordSocketService.cs file we will need to clear out the old initializations from the top of the class and just initialize all our Event Grid settings:
public partial class DiscordSocketService : IHostedService
{
    private readonly ILogger _logger;
    private readonly IApplicationLifetime _appLifetime;
    private readonly IConfiguration _config;

    private DiscordShardedClient discordClient;
    private string botToken;

    private string eventGridDomainEndpoint;
    private string eventGridDomainAccessKey;
    private string eventGridDomainHostname;
    private static EventGridClient eventGridClient;
    private TopicCredentials eventGridCredentials;

    public DiscordSocketService(
        ILogger<DiscordSocketService> logger,
        IApplicationLifetime appLifetime,
        IConfiguration config)
    {
        _logger = logger;
        _appLifetime = appLifetime;
        _config = config;
        botToken = _config["DISCORD_BOT_TOKEN"];
        eventGridDomainEndpoint = _config["EventGridDomainEndPoint"];
        eventGridDomainAccessKey = _config["eventGridDomainAccessKey"];
    }
If we then go down to the OnStarted() function in our class we want to remove the ConfigureStorageQueue() and ConfigureServiceBus() calls (as well as the functions below). We also want to remove the servicebusClient.CloseAsync() call in the OnStopping() function. Finally we also remove the functions ConfigureStorageQueue(), ConfigureServiceBus() and SBException(). We now call a ConfigureEventGrid() function in our OnStarted() method above calling our DiscordClient and define the function below:
private void ConfigureEventGrid()
{
    _logger.LogInformation("Configuring EventGrid | Endpoint: " + eventGridDomainEndpoint);
    eventGridDomainHostname = new Uri(eventGridDomainEndpoint).Host;
    _logger.LogInformation("Configuring EventGrid | Domain Hostname: " + eventGridDomainHostname);
    eventGridCredentials = new TopicCredentials(eventGridDomainAccessKey);
    eventGridClient = new EventGridClient(eventGridCredentials);
    _logger.LogInformation("Configuring EventGrid | EventGrid Client Version: " + eventGridClient.ApiVersion);
}
This method configures our Event Grid using the configuration variables we have defined earlier. Firstly it populates a variable for the host name component of our Event Grid that we will use at a later stage. Next we set the access token to be used when connecting to the Event Grid. Finally we initialize the Event Grid using our credentials.
Sending Events to Event Grid
So now we have our Event Grid client set up and ready to go but our Discord bot is still broken because the messages we use are sending to our deleted Storage Queue. To fix this we are going to implement a generic Event Grid message handler that will send and eventually receive events. Adding the ability send events is a lot easier at the moment than receiving them so create a new private task called SendEvent as below:
private Task SendEvent(string topic, string subject, string eventType, string data)
{
    var eventsList = new List<EventGridEvent>();
    eventsList.Add(new EventGridEvent()
    {
        Topic = topic,
        Id = Guid.NewGuid().ToString(),
        EventType = eventType,
        Data = data,
        EventTime = DateTime.Now,
        Subject = subject,
        DataVersion = "1.0"
    });

    try
    {
        eventGridClient.PublishEventsAsync(eventGridDomainHostname, eventsList).Wait();
    }
    catch (Exception ex)
    {
        Formatter.GenerateLog(_logger, LogSeverity.Error, "EventGrid", "Unable to add new message to EventGrid. Error: "
            + ex.Message + " | Inner: " + ex.InnerException.Message);
    }

    return Task.CompletedTask;
}
As you can see this method will allow us to send any event with a topic, subject, type and payload. Because this method is pretty generic we can use it for all the events Discord generates and have individual functions process them as required. Now, with our RecieveMessage method we can trim this right down to the following:
private Task ReceiveMessage(SocketMessage message)
{
    Formatter.GenerateLog(_logger, LogSeverity.Info, "Message", "New Message From : " + message.Source.ToString() + " | Message Content: " + message.Content);
    var serializedMessage = DiscordConvert.SerializeObject(message);

    return SendEvent("messages", "NewMessage", "DNetBot.Message.NewMessage", serializedMessage);
}
Configuring a Web Server for Web Hooks
Before we change our functions to process events we will need to provide a mechanism to receive return events from our Functions. Receiving events is a little bit more difficult as it requires a Web Hook that we can use to register against the incoming Event Grid subscription. The easiest way to do this is to add ASP.NET core functionality like we would with a normal website using a similar process to the one I explained here. Firstly, in your project file we need to change the SDK we are using by modifying the top line to be ‘
<PackageReference Include="Microsoft.AspNetCore" Version="2.2.0" />
This will add the core packages to our project when we save our project file. You will notice now under our frameworks and packages section we have AspNetCore modules available and added. Next we are going to modify the Main method in our program class to align it more with the standard AspNet template. We are going to push most of this configuration into a static IHostBuilder method called CreateHostBuilder. Our main method should now just have one line of code: await CreateHostBuilder(args).Build().RunAsync();. The CreateHostBuilder method we now modify to look like this:
public static IHostBuilder CreateHostBuilder(string[] args) =>
    Host.CreateDefaultBuilder(args)
        .ConfigureHostConfiguration(configHost =>
        {
            configHost.SetBasePath(Directory.GetCurrentDirectory());
            configHost.AddJsonFile("Config/hostsettings.json", optional: true);
            configHost.AddEnvironmentVariables(prefix: "BOT_");
            configHost.AddCommandLine(args);
        })
        .ConfigureAppConfiguration((hostContext, configApp) =>
        {
            configApp.AddJsonFile("Config/appsettings.json", optional: true);
            configApp.AddJsonFile(
                $"Config/appsettings.{hostContext.HostingEnvironment.EnvironmentName}.json",
                optional: true);
            configApp.AddEnvironmentVariables(prefix: "BOT_");
            configApp.AddCommandLine(args);
        })
        .ConfigureLogging((hostContext, configLogging) =>
        {
            configLogging.AddConfiguration(hostContext.Configuration.GetSection("Logging"));
            configLogging.AddConsole();
            configLogging.AddDebug();
        })
        .ConfigureWebHostDefaults(webBuilder =>
        {
            webBuilder.UseStartup<Startup>().ConfigureLogging(logging =>
            {
                logging.AddConsole();
                logging.AddDebug();
            });
        })
        .UseConsoleLifetime();
Most of this function is the same as the previous, but you will note we now have an argument in our builder called ConfigureWebHostDefaults which configures the web hosting component of our builder pipeline. This currently loads a class called
public class Startup
{
    public Startup(IConfiguration configuration)
    {
        Configuration = configuration;
    }

    public IConfiguration Configuration { get; }

    // This method gets called by the runtime. Use this method to add services to the container.
    public void ConfigureServices(IServiceCollection services)
    {
        services.AddControllers();
        services.AddSingleton<DiscordSocketService>();
    }

    // This method gets called by the runtime. Use this method to configure the HTTP request pipeline.
    public void Configure(IApplicationBuilder app, IWebHostEnvironment env)
    {
        if (env.IsDevelopment())
        {
            app.UseDeveloperExceptionPage();
        }
        //app.UseHttpsRedirection();
        app.UseRouting();
        app.UseAuthorization();
        app.UseEndpoints(endpoints =>
        {
            endpoints.MapControllers();
        });
        app.ApplicationServices.GetService<DiscordSocketService>().StartAsync(new System.Threading.CancellationToken()).Wait();
    }
}
This is the boilerplate code for running our default web host that enables web controllers, as well as routing, authorization and HTTPS. We also change our DiscordSocketService to a singleton and “warm it up” by starting the service. This allows us to initialize that service and have it ready and available before we connect our event pipeline. Finally we also need to add a launch settings configuration file under a Properties folder in our project. This launch settings file provides some of the configuration settings that AspNetCore needs to start serving web pages when we debug locally. Mine looks like this:
{
  "iisSettings": {
    "windowsAuthentication": false,
    "anonymousAuthentication": true,
    "iisExpress": {
      "applicationUrl": "http://localhost:62636/",
      "sslPort": 44384
    }
  },
  "profiles": {
    "DNetBot": {
      "commandName": "Project",
      "environmentVariables": {
        "ASPNETCORE_ENVIRONMENT": "Development"
      },
      "applicationUrl": "https://localhost:5043;http://localhost:5080"
    }
  }
}
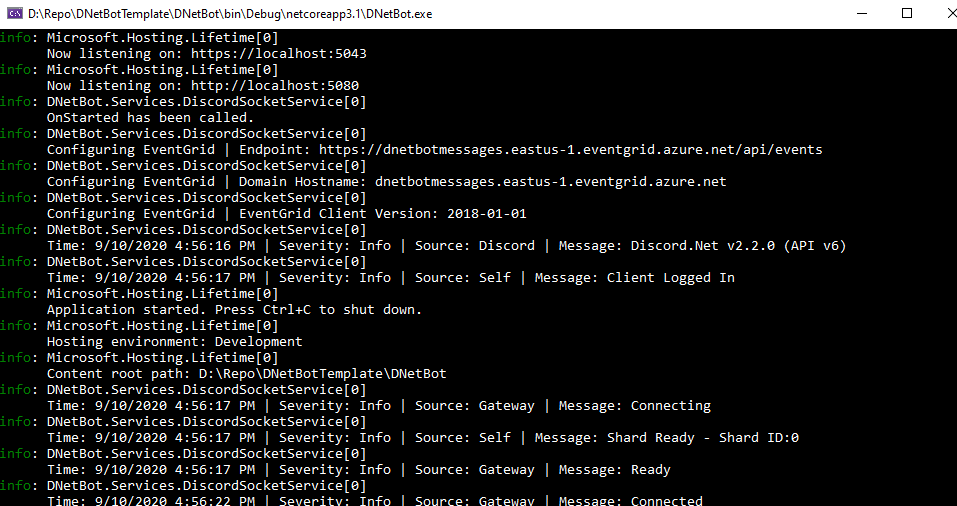
Now when we start our project we should have a running web server listed in our console application. Mine is running on ports 5043 and 5080 but you can specify different ports in our configuration file. But you will notice that if we try and browse our server that we get errors. This is because there is no controllers set up serving web pages. We are not going to wire any of these up to serve pages at this point, we are just going to set up an endpoint to handle Event Grid events.
Creating an Event Grid Receiver
Now we are ready to start wiring up our controller to receive events from our Event Grid pipeline. First, create a Controllers folder in your project structure so that we can keep all of our controllers together. Next, right click on the Controllers folder and add a new controller. Select the empty API option and name the controller EventGridController. This file shouldn’t have anything in it except the attributes for ApiController and Route. The first thing we will need to do is inject our logger and discord socket service into the controller so that we can access them both. To do this add the following to the top of your class:
private readonly ILogger _logger;
private readonly DiscordSocketService _discordSocketService;

public EventGridController(ILogger<string> logger, DiscordSocketService discordSocketService)
{
    _logger = logger;
    _discordSocketService = discordSocketService;
}
Next we are going to specify the Event Grid handler for when we want the both to send a message back to the Discord Server called ReturnMessage. This method is going to perform three steps. First it is going to check to make sure the event has an event type so that we know how to handle the event. Next it will check to see if the event type is an EventGridSubscriptionValidationEvent. This is a specific EventGrid event used to perform the handshaking when the web hook is established. Finally the method will send the message to the Discord server using the SendMessage method in the Discord socket service. The code for this is as follows:
// POST: /api/EventGrid/ReturnMessage
[Route("api/[controller]/ReturnMessage")]
[HttpPost]
public IActionResult ReturnMessage([FromBody] EventGridEvent[] events)
{
    foreach (var eventGridEvent in events)
    {
        _logger.Log(LogLevel.Information, "Event Grid Event Received. Type: " + eventGridEvent.EventType.ToString());

        // 1. If there is no EventType through a bad request
        if (eventGridEvent == null) return BadRequest();

        // 2. If the EventType is the Event Grid handshake event, respond with a SubscriptionValidationResponse.
        else if (eventGridEvent.EventType == EventTypes.EventGridSubscriptionValidationEvent)
            return Ok(ValidateWebHook(eventGridEvent.Data));

        // 3. If the EventType is a return message, send a message to Discord
        else if (eventGridEvent.EventType == "DNetBot.Message.ReturnMessage")
        {
            var message = JsonConvert.DeserializeObject<NewMessage>(eventGridEvent.Data.ToString());
            _discordSocketService.SendMessage(message).Wait();
            return Ok();
        }
        else
            return BadRequest();
    }
    return Ok();
}

private SubscriptionValidationResponse ValidateWebHook(object eventGridData)
{
    var payload = JsonConvert.DeserializeObject<SubscriptionValidationEventData>(eventGridData.ToString());
    return new SubscriptionValidationResponse(payload.ValidationCode);
}
This code then becomes pretty boilerplate for any other event we want to the proxy to pass through to Discord. For this to work we also need to make the SendMessage method on our Discord socket service public so that we can access that method from our web server.
Connecting our Event Grid Receiver
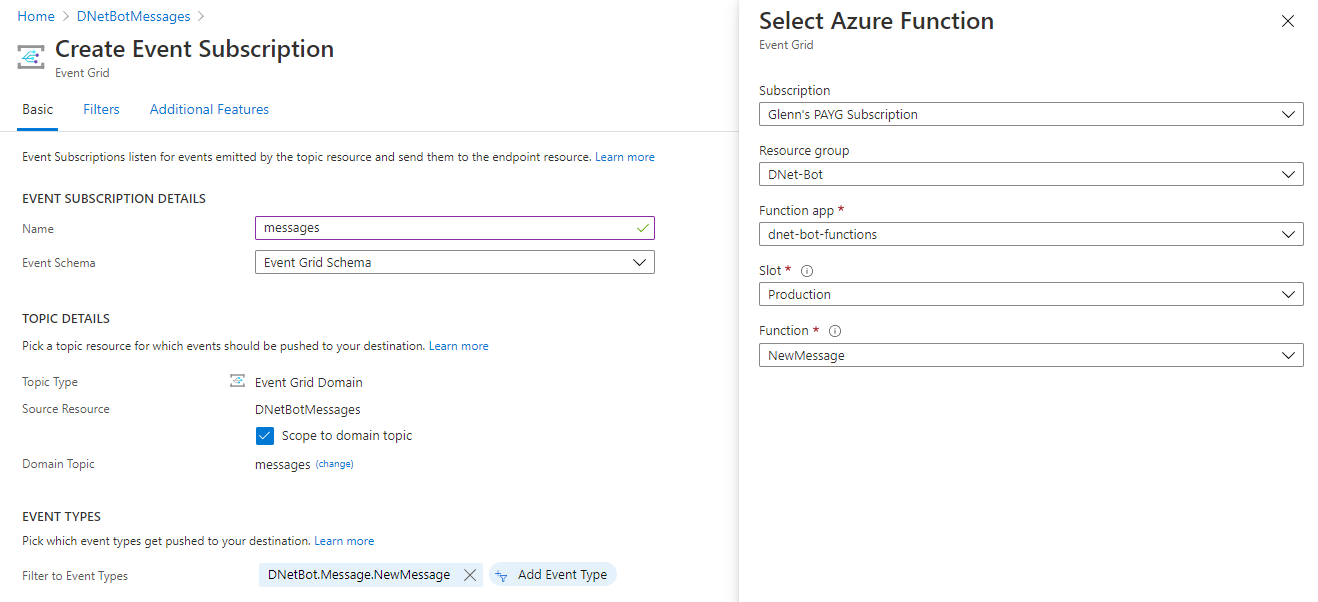
Once our controller is in place we can now connect our Event Grid events for processing. To use this locally I am using ngrok(https://ngrok.com/) to proxy into my local host. Once you have access to the web server in our Discord bot, open the Event Grid domain we set up earlier and create a new Event Subscription.
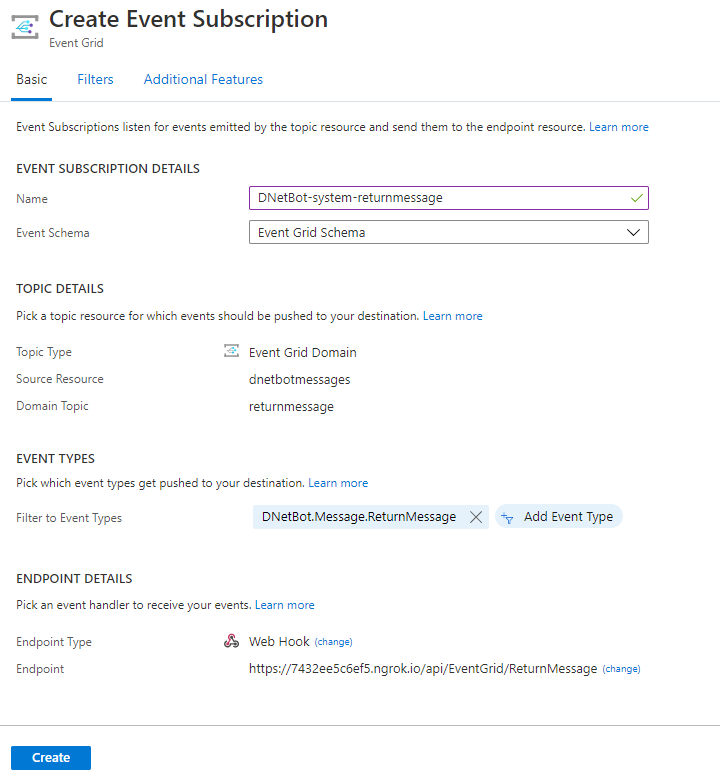
The name for the event is a descriptor to make tracking event subscriptions a little easier. The domain topic is a return message and for the connector we are going to filter out every event except DNetBot.Message.ReturnMessage as this is the only message we want to handle. Next we need to specify the endpoint type as a Web Hook and give the ngrok address details with the route to /api/EventGrid/ReturnMessage to point to our local web server API.
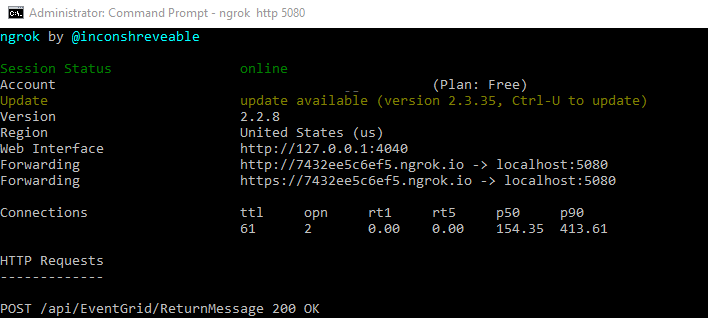
Once you hit create, Event Grid will go off and try to handshake with your web hook. In the ngrok proxy you should see a HTTP 200 request pop up. Also in your server logs you should also see the handshake request process.
Updating our Functions to Process Events
Now that we can send and receive events from our Discord bot proxy, we need to update our Functions to respond to events and potentially send return events. Let’s do this with the New Message function. Firstly, at the top of the function we want to specify an Event Grid client we can use to send events by using the following method:
private static EventGridClient eventGridClient = new EventGridClient(new TopicCredentials(System.Environment.GetEnvironmentVariable("EventGridKey")));
This will initialize the client using an environment variable called EventGridKey that we will specify later. Next, update the run method to look like the following:
[FunctionName("NewMessage")]
public static void Run([EventGridTrigger]EventGridEvent eventGridEvent, ILogger log)
{
    log.LogInformation("New Message Event Triggered On: {Topic} with the Subject: {Subject}", eventGridEvent.Topic.ToString(), eventGridEvent.Subject.ToString());
    ConvertedMessage message = DiscordConvert.DeSerializeObject(eventGridEvent.Data.ToString());
    if (message.Content.StartsWith("!ping"))
    {
        var returnMessage = new ConvertedMessage();
        returnMessage.ChannelId = message.ChannelId;
        returnMessage.Content = "pong!";

        var myEvent = new EventGridEvent(eventGridEvent.Id, "ReturnMessage", returnMessage, "DNetBot.Message.ReturnMessage", DateTime.Now, "1.0", "returnmessage");
        string eventGridHostname = new Uri(System.Environment.GetEnvironmentVariable("EventGridDomain")).Host;
        try
        {
            eventGridClient.PublishEventsAsync(eventGridHostname, new List<EventGridEvent>() { myEvent }).Wait();
        }
        catch(Exception ex)
        {
            log.LogError(ex.ToString());
        }
    }
}
This function will take an Event Grid triggered event and deserialize the data into a ConvertedMessage object. We then look at the message content and see if the message starts with the !ping command. If it does we generate a new ConvertedMessage type, set the channel ID to be the same as the incoming channel but set the content to be “pong!”. We then create a new EventGrid event with the same ID but with the return message topic details so our web hook can process it. We then publish this event.
To test this function you can run it locally but you need to proxy to it as well as the Discord bot proxy which requires the paid version of ngrok. If you don’t have that you can deploy the Function to your Azure tenancy and hook up the endpoint using the built in Azure Function trigger. In the app hosting settings for either of your function you will need to specify two environment variables:
"EventGridDomain": "https://<domain>.eastus-1.eventgrid.azure.net/api/events",
"EventGridKey": "<EventGridAccessKey>"

Now once everything is hooked up and running the bot should respond to the ping command. When you first run the bot and type in a command it will take a little while for the function to warm up, but after it does the bot should respond pretty quickly.
Next Steps
Well, this ended up being a pretty long post but we did get their in the end. The plan for the next lot of changes will be packaging up the bot into something almost automatically deployable into Azure using some form of single touch deployment. This way you should be able to deploy the bot with some minor configuration variables with almost a single click.